How to make iPad-compatible movies
(updated Feb. 2026)
Things you need
(This will work for *any* device, if you think about things you might modify. This is specifically showing how to produce a quality 1024 x 768 iPad2 retina-type movie.)
Step 1: Make your movie on VMD
I'm assuming you know how to produce a trajectory, and produce the representation(s) you want. I will cover other things which are important for the video file. FIRST: run VMD from the command line, specifying the window size with appropriate dimensions:
clapeyron $> vmd -size 1024 768
Do this in a terminal window you can dedicate to VMD, as this window becomes the VMD console (where messages go).
Load your trajectory, and adjust the placement of your system in the window using the 'T' and 'S' and 'R' key commands. A 1000 frame DCD will run for approximately 30 seconds. Other things to do here:
Using the Movie Maker tool (Extensions -> Visualization -> Movie Maker), choose the following settings:
Now you can click "Make Movie" and wait for it to complete. If the process seems to hang, look at your terminal/VMD console and see if it is asking for some sort of response (hitting should do the trick). The movie that VMD makes is NOT the one we want; we do want the image files (extension .ppm), however, which is why the "Delete Image Files" switch needs to be unchecked. View the VMD movie in VLC so you know what VMD gives you.
Converting the movie using ffmpeg
Here is where you are able to really improve the quality of your movie, depending on how recent your ffmpeg is. Sometimes the options are changed or updated, so if you get any errors, you should check the documentation. These pages may be useful to you: ffmpeg codec documentation; ffmpeg tutorial.
In the directory where you made your VMD movie, there should be a number of files with .ppm extensions. In that directory, issue a ffmpeg command similar to this. Of course change it to fit your file names; this would work for a series of ppm files as A8.00001.ppm, A8.00002.ppm … A8.00999.ppm:
clapeyron $> ffmpeg -an -i ./A8.%05d.ppm -c:v mpeg4 -an ./A8.mp4 ffmpeg -an -i ./ChainC.%5d.ppm -c:v h264 -an ./ChainC.m4v
MPEG-4 Part 2 (mpeg4) is a decent encoder, but H.264 is what Apple likes. ffmpeg may have this compiled in (and it produces much smaller files). To check:
clapeyron $> ffmpeg -an -i ./A8.%05d.ppm -c:v h264 -an ./A8.m4v
The video codec switched"-c:v" switches are what is important here, and what VMD does not do. Usually ffmpeg will make good default choices for quality, but feel free to take a deep dive into the options. The "-an" switch turns off any audio (not really necessary but sometimes strange audio can be unintentionally introduced). A 1000-frame, 30 second video file from this step should be 3-4 MB in size. You can view it in VLC if you want to make sure the quality is OK (and compare it with the VMD default).
If you are interested in using ffmpeg for other tasks, you can see all the encoding/decoding capabilities by issuing the command 'ffmpeg -codecs | more' in your terminal. Of particular use are the examples. Here is a H264-specific tutorial (2017). Also tutorials: this one. And this one.
Final conversion via HandBrake (not necessary if the H264 works!)
Note the settings: Constant quality, frame rate same as source (constant). Apple uses H.264 encoding, which is MPEG4 part 10(!). We simply read the file in, and output a new version. It should only take a few seconds.
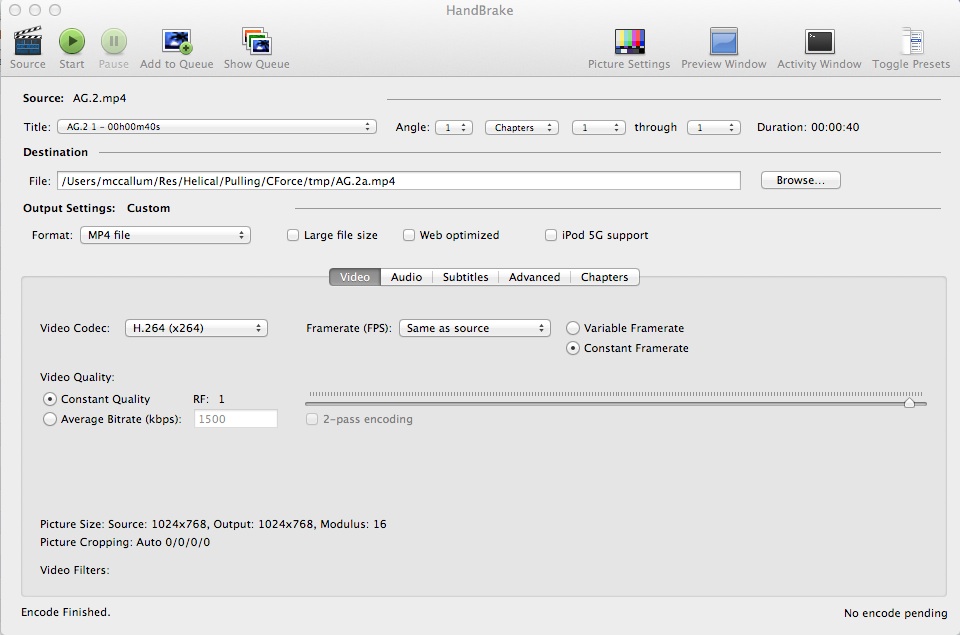
At some point, this step should not be necessary. Handbrake actually uses ffmpeg to do its encoding, but it is not obvious what the proper set of ffmpeg switches are. HandBrake is easy to use, so we are not losing much by using it.
A 1000-frame, 30 second video file from this step should be approximately 20 MB in size.
Transfer
The easiest way to get this file to your iPad is through iTunes.
(updated Feb. 2026)
Things you need
- ffmpeg (test with "which ffmpeg"; install with fink or get a binary from ffmpeg.org)
- vmd of course (relatively new, 1.8.x or above)
- Handbrake (find it HERE); Depending on your version of OS X, you may need to grab an older version.
- VLC (can be used to play video, even if iPad won't).
(This will work for *any* device, if you think about things you might modify. This is specifically showing how to produce a quality 1024 x 768 iPad2 retina-type movie.)
Step 1: Make your movie on VMD
I'm assuming you know how to produce a trajectory, and produce the representation(s) you want. I will cover other things which are important for the video file. FIRST: run VMD from the command line, specifying the window size with appropriate dimensions:
clapeyron $> vmd -size 1024 768
Do this in a terminal window you can dedicate to VMD, as this window becomes the VMD console (where messages go).
Load your trajectory, and adjust the placement of your system in the window using the 'T' and 'S' and 'R' key commands. A 1000 frame DCD will run for approximately 30 seconds. Other things to do here:
- If you are using the "secondary structure" coloring scheme, make sure you open a TKcon and use 'sscache' to update the representation every frame. If you don't know how to do this, go back to the appropriate page and figure it out.
- In the "Representations" menu, there is a "Trajectory" tab. Click it. Near the bottom of the window is "Trajectory Smoothing Window Size". Experiment with that; setting this to 5 for most representations, or 10 or more for fast-moving representations (such as "Lines") will make the video smoother. You must do this for EVERY representation you have defined for your system.
- Transparent representations such as "glass" will not render that well using the Tachyon renderer. You can try them, but you will probably be disappointed. Also remember that colors will lose some of their pop going to video.
- Adjust the length of your trajectory BEFORE you open up the Movie Maker app. If you do it after you have already opened the app, your adjustments will not be reflected in the app and you will have to quit VMD to start again.
Using the Movie Maker tool (Extensions -> Visualization -> Movie Maker), choose the following settings:
- Renderer: "Internal Tachyon" or "Tachyon" (internal is safer, but perhaps the external is faster)
- Movie Settings (upper 1/2): up to you
- Movie Settings (Lower 1/2): uncheck "Delete Image Files"! You may add descriptive text here too.
- Format: MPEG-2 (ffmpeg). This should work; if it ends up not working, then you do not have ffmpeg installed (see first step, above).
Now you can click "Make Movie" and wait for it to complete. If the process seems to hang, look at your terminal/VMD console and see if it is asking for some sort of response (hitting should do the trick). The movie that VMD makes is NOT the one we want; we do want the image files (extension .ppm), however, which is why the "Delete Image Files" switch needs to be unchecked. View the VMD movie in VLC so you know what VMD gives you.
Converting the movie using ffmpeg
Here is where you are able to really improve the quality of your movie, depending on how recent your ffmpeg is. Sometimes the options are changed or updated, so if you get any errors, you should check the documentation. These pages may be useful to you: ffmpeg codec documentation; ffmpeg tutorial.
In the directory where you made your VMD movie, there should be a number of files with .ppm extensions. In that directory, issue a ffmpeg command similar to this. Of course change it to fit your file names; this would work for a series of ppm files as A8.00001.ppm, A8.00002.ppm … A8.00999.ppm:
clapeyron $> ffmpeg -an -i ./A8.%05d.ppm -c:v mpeg4 -an ./A8.mp4 ffmpeg -an -i ./ChainC.%5d.ppm -c:v h264 -an ./ChainC.m4v
MPEG-4 Part 2 (mpeg4) is a decent encoder, but H.264 is what Apple likes. ffmpeg may have this compiled in (and it produces much smaller files). To check:
clapeyron $> ffmpeg -an -i ./A8.%05d.ppm -c:v h264 -an ./A8.m4v
The video codec switched"-c:v" switches are what is important here, and what VMD does not do. Usually ffmpeg will make good default choices for quality, but feel free to take a deep dive into the options. The "-an" switch turns off any audio (not really necessary but sometimes strange audio can be unintentionally introduced). A 1000-frame, 30 second video file from this step should be 3-4 MB in size. You can view it in VLC if you want to make sure the quality is OK (and compare it with the VMD default).
If you are interested in using ffmpeg for other tasks, you can see all the encoding/decoding capabilities by issuing the command 'ffmpeg -codecs | more' in your terminal. Of particular use are the examples. Here is a H264-specific tutorial (2017). Also tutorials: this one. And this one.
Final conversion via HandBrake (not necessary if the H264 works!)
Note the settings: Constant quality, frame rate same as source (constant). Apple uses H.264 encoding, which is MPEG4 part 10(!). We simply read the file in, and output a new version. It should only take a few seconds.
At some point, this step should not be necessary. Handbrake actually uses ffmpeg to do its encoding, but it is not obvious what the proper set of ffmpeg switches are. HandBrake is easy to use, so we are not losing much by using it.
A 1000-frame, 30 second video file from this step should be approximately 20 MB in size.
Transfer
The easiest way to get this file to your iPad is through iTunes.