 go to UOP homepage
go to UOP homepage
go to UOP homepage
 © Copyright 2012–2026
These instructions assume that some nice system administrator (likely me) has made you an account on some UNIX/Linux server elsewhere (perhaps in the same room). The system administrator will have provided you with three pieces of information: (1) the name or IP address of the machine (host.domain.xxx), and either one will likely work interchangabley, depending on how the server has (or has not) had its name made available to the world; (2) a user name (user); (3) a temporary password that you absolutely should change as the very first thing you do on your very first login. Now, what do you do with that information? How do you go about logging into that machine? That is what this page is about. In short, you need a terminal program on your local machine so that you can start a login terminal on the remote host (the server is also called a host because it is hosting you). I assume that anyone geeky enough to be working locally on an Ubuntu box does not need any such instructions (even more so if you are running any other Linux distro), so I only focus on the two biggest consumer operating systems. Linux instructions would look mostly like the Mac instructions, except that your default terminal is probably already X-windows capable (so even simpler). Macintosh
Congratulations!
Whether you realize it or not, you are already working on a UNIX machine.
Your instructions are then easy.
Under Applications>Utilities, double-click Terminal.app (or just Terminal, if your machine is configured not to show file extensions).
At the prompt type the following, substituting your user name for user
and the computer name (or IP address) for host.domain.xxx
(also, don't type the % sign, which is an abbreviation for the command-line prompt):
In spite of the ease of that, a much more capable terminal program is the XQuartz X11 terminal.
This will support some programs with graphical user interfaces that you start on the remote machine, allowing the graphics to pop up on your local computer.
Download the file XQuartz-X.Y.Z.dmg
(X,
Y, and
Z,
are numbers) from the macosforge site.
Open the disk image (double-click the .dmg file, if it has not already mounted as if it were a drive), drag the application into your Applications folder, eject the disk image, and discard the .dmg file.
Now, double-click XQuartz.app in your Applications folder, and a terminal pops up looking much like the built-in Terminal.app, but with more bells and whistles.
Now, to log in type:
This will be covered more elsewhere, but, since you have a UNIX terminal already on a Mac, the scp
command to transfer files is available by default (but you can skip reading this until you need to transfer files).
It works a lot like cp (see [Working in UNIX/Linux]), but between computers, and therefore has a
slightly adjusted syntax so that you specify what computer a file is on, in addition to where on that computer; it also needs your password for each
transfer.
If you are in a shell on your local computer (not logged into the server),
a single-file transfer from the remote computer looks like
(the -r option also works):
Though command-line interface can be very powerful for automation, it can also be very tedious for exploratory tasks.
If you would like to use an ssh connection to make it look like your remote directory is on your
local machine, install both OSXFUSE and SSHFS from this site.
This will make the command sshfs available, and the syntax for this is: MS Windoze Sorry, this is a journey. The lack of any native ssh and scp support on Windows is baffling. Both PuTTY and WinSCP discussed below bring up dialogue boxes to configure the connection each time you start them. With some playing around, you should be able to figure out how to save your configuration, so you don't have to re-enter it each time. - Secure Shell (ssh)
PuTTY is a solid and lightweight ssh utility for Windows (TTY is a geeky reference to a terminal).
You directly download the single executable file from the putty website.
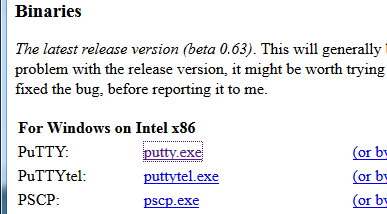
Click on "download PuTTY here", and look for putty.exe under the heading
"The latest release version (beta 0.XY)", where X and Y are numbers
(like this
When you run PuTTY, it will not pop open a terminal right away.
First, you set up the configuration under the "Session" tab of the dialogue box that pops up
(like this Now a terminal window should pop open asking you to "login as:" (enter your user name), after which it asks for your password. Once logged in you will see the command-line prompt of the remote machine, which is likely something like [user@host:~]%. Now move on to the above tab [Working in UNIX/Linux]. When you are done working in a terminal, hold down "contol" (Ctrl) key and press D to exit. - Secure Copy (scp)
Since there is no ssh/scp-capable shell running directly on your local machine
(PuTTY emulates such a terminal, but you only ever get command-line access to the remote host, not the local machine),
there is a very important relative of ssh that has to be implemented separately,
and this is the use of the same encrypted ssl protocol to transfer files, called scp.
The best replacement for this is the program WinSCP.
If you do not need or want to transfer files between your local computer and the remote host, you can skip this.
Unlike, PuTTY, WinSCP must be installed with administrator priveleges.
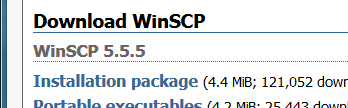
To get the program, visit the WinSCP website and click "[Go to Download page]".
You want the WinSCP X.Y.Z "Installation package", where X, Y, and Z are numbers
(like this The WinSCP interface is much different than the command-line version of scp, long familiar to hardened computer geeks. It has a gentle graphical interface that makes it look like your directory on the remote host is on your local machine, such that you can drag and drop files to it and from it (but old-fashioned scp is doing all the action under the hood). Similar to what you expect from a thumb-drive, since this is still an external storage medium, the default action of drag-and-drop is to copy a file, rather than move it (true to its name), but right-clicking a file can bring up a menu to delete (permanently) files on the server.
In order to open your directory on the other machine, you first need to set up the connection to that machine in the dialogue box that
pops up when you double-click the WinSCP program
(like this You have to configure the WinSCP connection even if you are already logged in with PuTTY because the two connections are completely separate (so be careful not to do silly things like delete a file over one connection that you were working with in another, which also goes for just having multiple PuTTY windows open ... it happens). - X11 Support[Coming soon. Notes to self] |

