In this section, we will learn how to create a structure file from a simple PDB file. Structure files are necessary in order to run molecular simulations. We will also learn how and why PDB files are broken up into different segments. We will also learn about associated library files (called topology and parameter files) which allow us to generate the necessary files.
Why two files?
PDB Specification
PDB stands for Protein Data Bank. It turns out that standard PDBs only contain coordinates of atoms. It does not specify which atoms are connected to which. There are extensions to the PDB standard which allow this information to be given, but it is not widely used. In fact VMD only reads lines beginning with “ATOM” or “HETATM”. How then does VMD draw in bonds? The answer is that standard molecular viewers which read PDB files make some sort of default bond definition: 1.5 angstroms or less means the atoms are bonded (or some other length). This is fine for displaying information, but when we move to simulations, where bonded and non-bonded (VdW-type) interactions are much different, bond definitions must be made. There is also the additional complication that PDB files obtained from RCSB often do not contain coordinates for hydrogens (x-rays can’t see these little guys!!), and of course, hydrogens must be included in any simulation of a protein.
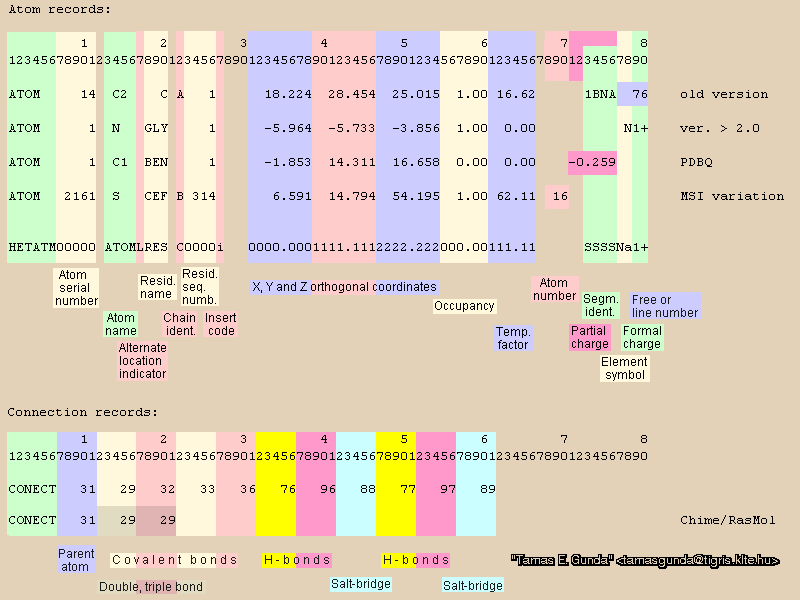
The PDB (and other) specifications can be found a the RCSB here (this document is 200+ pages long! Use of the index is critical. For example, coordinates are discussed on page 186.) In addition, here is a graphic (kindly provided by Tamas Gunda) which spells out the PDB specification. It is color-coded to help you understand what information is there (of course the actual PDB will just be a plain text file, black and white). If you looked at any PDB files from the RCSB, you know there is also a large amount of information, in the form of comments in the PDB header.
Information contained in a PSF
The PSF (or Protein Structure File) contains bonding and other information that a molecular simulation needs in order to define certain parameters. This includes connectivity, classical charge, and other things. Here is part of a PSF file for a small peptide:
PSF CMAP
2 !NTITLE
* A10 : A10 ALPHA HELIX GB,
* DATE: 5/ 4/ 6 15:46:13 CREATED BY USER: mccallum
112 !NATOM
1 A10 1 ALA CAY 24 -.270000 12.0110 0
2 A10 1 ALA HY1 3 .900000E-01 1.00800 0
3 A10 1 ALA HY2 3 .900000E-01 1.00800 0
4 A10 1 ALA HY3 3 .900000E-01 1.00800 0
5 A10 1 ALA CY 20 .510000 12.0110 0
The atom number, segment number (more on this later), residue name, atom name, atom type number, charge, and mass are specified here.
What we need to do, essentially, is use the PDB file to specify the primary sequence of the protein. We will piece together the protein using the topology libraries from this sequence, like adding beads to a chain. This will generate the PSF file. Then, we will re-associate the coordinates to this PSF file, making a new PDB, paired exactly with the PSF. So, we both generate a PSF and “clean” the PDB for simulation use. There are a number of ways to do this. The two ways we will do it is through the tkcon, and a menu plugin, AutoPSF.
tkcon method (Make sure you are using a tkcon!!)
The general procedure here is:
- acquire a suitable protein
- strip out the protein from the water from the...
- label it with one or more segments
- list the primary sequence of the residues
- create a PSF using the topology library
- re-coordinate the PDB with the PSF
- add missing hydrogens (if required)
- load the matched pair into VMD and compare the structure with the original RCSB PDB
To prepare, we will need the topology file (top_all27_prot_lipid.rtf). Find it HERE, or get it from the FILES PAGE. Put it in your main class directory so you can find it easily.
Open up VMD and then a tkcon. We will use the small leucine zipper that we examined earlier. Let’s assume that we are going to download 1PGB from RCSB, and eventually run a simulation on it. NOTE: for the most part, these lines should be entered as written here: after each line hit [return]. This is not always necessary, but it is good programming practice to keep one command per line. Remember that everything after the hash "#" character is a comment and is not processed.
mol pdbload 1pgb # loads 1PGB into VMD
set pgb [atomselect top protein] # variable assignment - only the protein, no waters, etc
$pgb writepdb 1pgb_new.pdb #Writes the coordinates out
Now, examine this PDB file you just wrote out (you can do this by entering ‘more 1pgb_new.pdb’. Notice there are no hydrogens!
package require psfgen #loads the PSF generation package
topology top_all27_prot_lipid.rtf #this loads the topology library file
pdbalias atom ILE CD1 CD
After loading the topology file, you may see a bunch of warning messages scroll by. This is normal. The ‘pdbalias’ command renames a particular carbon atom to one that our simulation software will recognize. More on this type of thing later.
segment main {
pdb lpgb_new.pdb
}
coordpdb 1pgb_new.pdb main
guesscoord
writepdb 1pgb_fixed.pdb
writepsf 1pgb_fixed.psf
Line by line, we label a segment as ‘main’ (main will contain the whole protein. In general, ANY name can be used here, but it should be descriptive. It must be 4 letters or less.). Then we read the primary sequence from the PDB file ‘1pgb_new.pdb’. Notice the brackets—these brackets define the PSF generation.
Next, the atomic coordinates are taken from the same PDB file (if some atoms are different between our new structure and the PDB file we use for coordinates, we will receive a warning). Finally, missing coordinates are guessed by a (pretty good) algorithm (here, all the coordinates we were warned about should be fixed up).
Some messages will scroll by at some points; for example, after ‘coordpdb’, you will get a message about missing coords. After ‘guesscoord’, you will get a message about poorly-guessed coordinates. This is perfectly OK. You can now look at your PDB and PSF files to make sure they are not empty: ‘more 1pgb_fixed.pdb’. After that, delete the existing 1pgb (‘mol delete all’) and load the new ones. PSFs ALWAYS get loaded first if they are available.
mol delete all
mol load psf 1pgb_fixed.psf pdb 1pgb_fixed.pdb
Everything should look normal at this point. The nice thing about this method is that these commands could be saved into a file, and either “sourced” from within the tkcon (as we did with the coloring.tcl script in Week 1), or it can be run from any terminal via VMD (you can run VMD with a terminal command, also).
AutoPSF method
Now the “easy” way. Before we start, I should mention that you should always test whether the AutoPSF method can be trusted to make good PSFs. We will of course test our AutoPSF-generated PSF with the one we made using tkcon. Here the procedure is much easier because it is menu-driven. Open up “Extensions...Modeling..Automatic PSF Builder” from the VMD main menu. Once it is open, select the proper molecule. The old file will have “_autopsf” added to it to name the new matched pair of files.
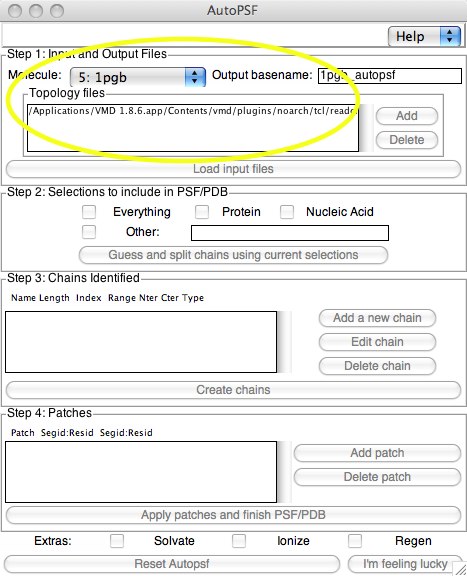
In Step 1, the topology files are selected (these are automatically found inside VMD; it is possible to add a different set, however). You don’t have to click on “Add...”; this adds additional files. When you are satisfied with these selections, you can click on “Load input files...”.
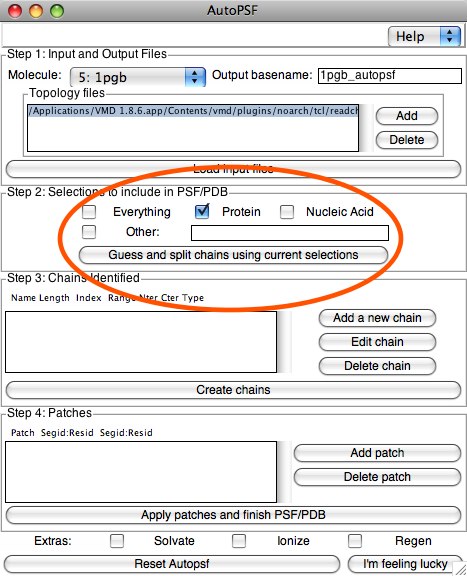
Step 2 is creating the selections to add to the PSF. In our example, we will select the “Protein” button (which will separate out any waters, etc) Here, we could make any sort of simple or complex selection in order to break our RCSB PDB into chains. We will see an example of this later with the micelle PDB. When you are ready, click the button “Guess and split chains...”. If we wanted to make more than one chain, we would do this selection step multiple times. Each time we click “Guess and split...”, it adds information to the next section, Step 3: Chains identified. In our case, we will have only one chain, so you can click “Create Chains” now.
Step 3 is easy with one chain, without any editing. If you do want to edit (for example, you want to add patches on the first and/or last residue(s)), highlight the chain, and click “Edit Chain”. This will allow you to change things at the ends. If you don’t want to edit, simply click “Create chains”. In this example, this actually finishes our process, as we don’t need the next step. In Step 4, Patches allows us to change parts of the molecule(s) with instructions called patches, which add and subtract atoms to form standard mutations. For example, we may want our N-terminal end of the protein to be amide-blocked. We will learn this in a little while.
When you are finished, if you are going to do another PSF generation, you would click on “Reset Autopsf”. Notice that the new matched pair automatically loaded.
How can we compare to see if the new matched pair is exactly the same (atoms, etc) as the old one? There are two ways. First, we can compare the two structures visually. This is OK, but probably not very satisfying. The other way is to perform an RMSD. If the structures are exactly the same, the number of atoms will be the same, and the RMSD will succeed with an RMSD of 0.0. Remember that the original PDB did not contain hydrogens, so you need to either specify ‘backbone’ or ‘noh’ in the selection.
Advanced topic: Multiple chains
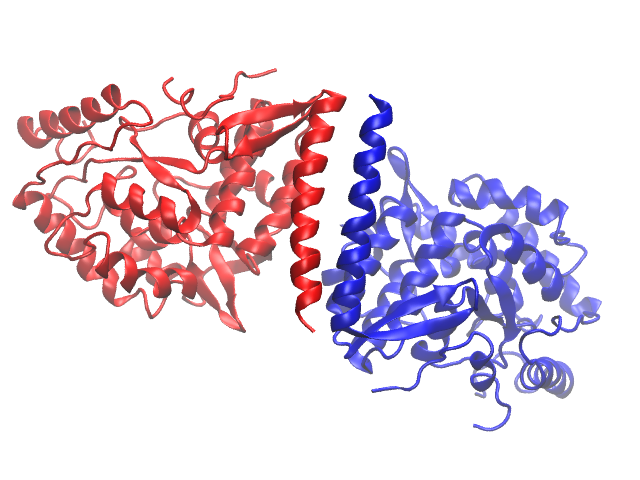
Some proteins consist of symmetric pieces, so it is natural to treat these somehow are repeating units. However, similar to quantum numbers for multi-electron atoms, each atom in a simulation set must be uniquely identified. The answer to this is to make each symmetric piece a chain. Everything about atoms in two separate chains can therefore be the same, except the chain ID. You may see whether or not a protein uses chains by coloring the protein by chain (this is 2PAH):
Another reason to break up coordinates into smaller pieces has to do with counting limits in simulation software. To see if your protein has separate chains, Look under the Graphical Representations -> Selections -> Keyword "chain". If you see more than one letter, the protein has multiple chains, and you must break the PSF up into the chains as segments (including solvent/water molecules, ions, and/or ligands). 1FO4 (offered in Assignment 3) is such a protein.
>Main< (CHEM181SessionII) 57 % mol pdbload 1fo4
0
>Main< (CHEM181SessionII) 59 % set ca [atomselect top "protein and chain A and not hydrogen"]
atomselect1
>Main< (CHEM181SessionII) 60 % set cb [atomselect top "protein and chain B and not hydrogen"]
atomselect2
>Main< (CHEM181SessionII) 61 % $ca writepdb chainA.pdb
>Main< (CHEM181SessionII) 62 % $cb writepdb chainB.pdb
>Main< (CHEM181SessionII) 63 % package require psfgen
1.6.2
>Main< (CHEM181SessionII) 64 % topology /usr/local/charmm/toppar/top_all27_prot_lipid.rtf
psfgen) reading topology file /usr/local/charmm/toppar/top_all27_prot_lipid.rtf
psfgen) > CHARMM22 All-Hydrogen Topology File for Proteins and Lipids <<
psfgen) >>>>>> Includes phi, psi cross term map (CMAP) correction <<<<<<
psfgen) >>>>>>>>>>>>>>>>>>>>>> July 2004 <<<<<<<<<<<<<<<<<<<<<<<<<<
psfgen) All comments to ADM jr. via the CHARMM web site: www.charmm.org
psfgen) parameter set discussion forum
psfgen)
psfgen) Created by CHARMM version 31 1
psfgen) cross-term entries present in topology definitions
>Main< (CHEM181SessionII) 65 % pdbalias atom ILE CD1 CD
psfgen) aliasing residue ILE atom CD1 to CD
>Main< (CHEM181SessionII) 66 % pdbalias residue HIS HSD
psfgen) aliasing residue HIS to HSD
>Main< (CHEM181SessionII) 67 % segment ChA {
first NONE
last NONE
pdb chainA.pdb
}
psfgen) building segment CHA
psfgen) setting patch for first residue to NONE
psfgen) setting patch for last residue to NONE
psfgen) reading residues from pdb file chainA.pdb
psfgen) extracted 1299 residues from pdb file
psfgen) Info: generating structure...psfgen) Info: skipping improper N-C-CA-HN at beginning of segment.
psfgen) Info: skipping cross-term C-N-CA-C-N-CA-C-N at beginning of segment.
psfgen) Info: skipping conformation C-N-CA-C at beginning of segment.
psfgen) Info: skipping conformation C-CA-N-HN at beginning of segment.
psfgen) Info: skipping bond C-N at end of segment.
psfgen) Info: skipping improper C-CA-N-O at end of segment.
psfgen) Info: skipping cross-term C-N-CA-C-N-CA-C-N at end of segment.
psfgen) Info: skipping conformation CA-C-N-CA at end of segment.
psfgen) Info: skipping conformation N-CA-C-O at end of segment.
psfgen) Info: skipping conformation N-CA-C-N at end of segment.
segment complete.
>Main< (CHEM181SessionII) 68 % coordpdb chainA.pdb ChA
psfgen) reading coordinates from pdb file chainA.pdb for segment ChA
psfgen) Warning: failed to set coordinate for atom OXT VAL:1332 CHA
>Main< (CHEM181SessionII) 69 % guesscoord
psfgen) Info: guessing coordinates for 10088 atoms (0 non-hydrogen)
.
.
psfgen) Warning: poorly guessed coordinate for atom HG2 PRO:1230 CHAINA
psfgen) Warning: poorly guessed coordinate for atom HG2 PRO:1262 CHAINA
>Main< (CHEM181SessionII) 71 % writepdb 1fo4_A.pdb
psfgen) Info: writing pdb file 1fo4_A.pdb
psfgen) warning: truncating segid CHAINA to 4 characters allowed by pdb format
psfgen) Info: Atoms with guessed coordinates will have occupancy of 0.0.
psfgen) Info: pdb file complete.
>Main< (CHEM181SessionII) 72 % writepsf 1fo4_A.psf
psfgen) Info: writing psf file 1fo4_A.psf
psfgen) total of 20164 atoms
psfgen) total of 20387 bonds
psfgen) total of 36924 angles
psfgen) total of 54153 dihedrals
psfgen) total of 3339 impropers
psfgen) Structure requires EXTended PSF format
psfgen) total of 1297 cross-terms
psfgen) Info: psf file complete.
Hydrogens can be stripped out and added back in with "guesscoord". You can then repeat this for Chain B.
Advanced topic: Multiple copies
You can then repeat this for Chain B.
Often your simulation system may have multiple copies of smaller molecules: the solvent (usually some water model), lipids in a bilayer, sodium ions, etcetera. Even though there are plugins which make creating a water “box” and adding salt ions (in approximately equilibrium positions) easy, there may come a time when you need to create a starting point for a collection of other molecules. In this exercise, we will create a simple arrangement of POPE (phosphatidylethanolamine) lipids. We will use the file ‘pope1.pdb’ from FileSet2. One lipid will be replicated into nine, and we will arrange them in a 3x3 LIP using tkcon. It will also serve to illustrate how to assign different segment IDs to the lipids. Segment names cannot be more than four characters, unfortunately.
Assuming this is a new session, we will load psfgen and the topology file again. If this is not a new session ‘resetpsf’ must be used to tell psfgen we are starting a new PSF.
package require psfgen
topology top_all27_prot_lipid.rtf %these two lines OR the next one...
% resetpsf
mol load pdb pope1.pdb
This next part is three loops (it would actually be more efficient to do one triple-nested loop, but it’s less obvious to a novice). ‘i’ is a counting variable. This will create nine lipids in the PSF, but to begin with they will all be stacked upon themselves. They will be segment-labeled R11 through R13 --- three rows with three each.
for { set i 1 } { $i <= 3} {incr i} {
segment R1$i {
first NONE
last NONE
residue 1 POPE
}
coordpdb pope1.pdb R1$i
}
for { set i 1 } { $i <= 3} {incr i} {
segment R2$i {
first NONE
last NONE
residue 1 POPE
}
coordpdb pope1.pdb R2$i
}
for { set i 1 } { $i <= 3} {incr i} {
segment R3$i {
first NONE
last NONE
residue 1 POPE
}
coordpdb pope1.pdb R3$i
}
writepsf pope9.psf
writepdb pope9.pdb
mol delete all
mol load psf pope9.psf pdb pope9.pdb
Let’s go though one of these line-by-line:
‘for { set i 1} {$i <= 3} {incr i} {‘ starts a loop. The looping variable is “i”, i will run from 1 to 3 inclusive.
‘segment R1$i {‘ the first segment is called R11 (as i = 1 to begin with).
‘first NONE
last NONE’ We will not modify the structure at either end of the primary sequence of this segment
‘residue 1 POPE’ here we specify the primary sequence. Since there is only one residue per segment, and that is a POPE molecule, that is all we ahve to say here. The alternative would be to read the primary sequence from the PDB file; in this case we’d say ‘pdb molecule_name.pdb’ where ‘molecule_name.pdb’ is the PDB file containing our sequence.
Now we will move three lipids in the x direction 10 angstroms, and three lipids out 10 angstroms in the minus x direction, leaving a line of three sets of three POPE lipids. Next we move one from each set out 10 angstroms in the y direction, and one from each set out 10 angstroms in the -y direction. Finally, we write everything out, and reload the new LIPded PDB (The first PSF is OK --- remember PSFs do not contain positions!) Remember, in tkcon, you can recall previous lines with the key and move forward through them with the key. You should notice the POPEs “moving” during these steps.
mol load psf pope9.psf pdb pope9.pdb
set r2 [atomselect top "segid R21 R22 R23"]
$r2 moveby "10 0 0"
set r3 [atomselect top "segid R31 R32 R33"]
$r3 moveby "-10 0 0"
set r3 [atomselect top "segid R12 R22 R32"]
$r3 moveby "0 10 0"
set r3 [atomselect top "segid R13 R23 R33"]
$r3 moveby "0 -10 0"
set all [atomselect top all]
$all moveby [vecinvert [measure center $all]]
animate write pdb pope9_grid.pdb
(Can you think of an easier way to make the selections? Some sort of loop…?)
The last two lines re-center our grid of POPEs, and write out the new coordinates. As always, you should delete the existing views, and reload this new PSF/PDB to make sure it looks good. The extensive set of examples used in the UIUC gramicidin tutorial (rotations, etc) are probably very useful to gain some experience with, also.
Back: Advanced tcl
Next: VMD: Trajectories