CMM 4/10/2026
Script Library: scriptlibrary.tar
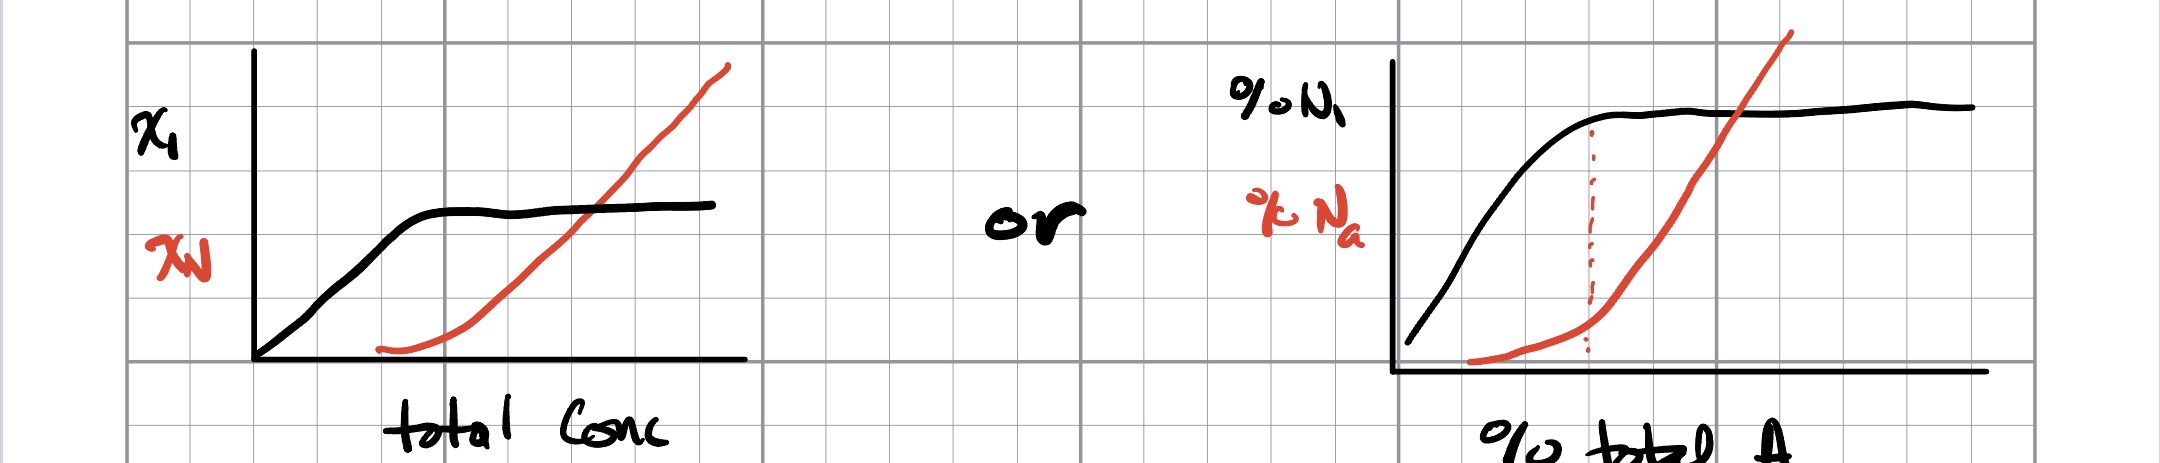
Monomer and aggregate concentration versus solution concentration
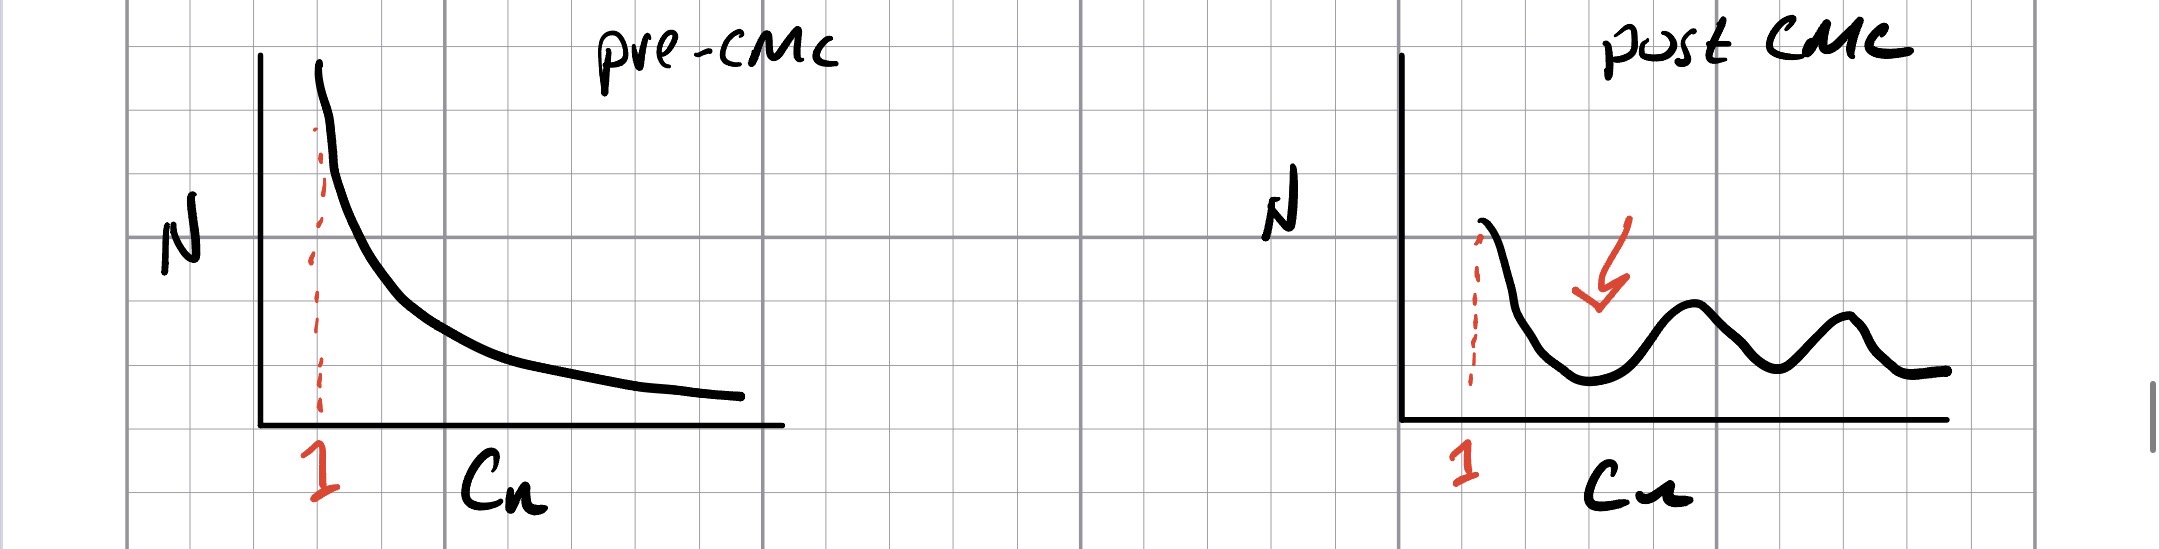
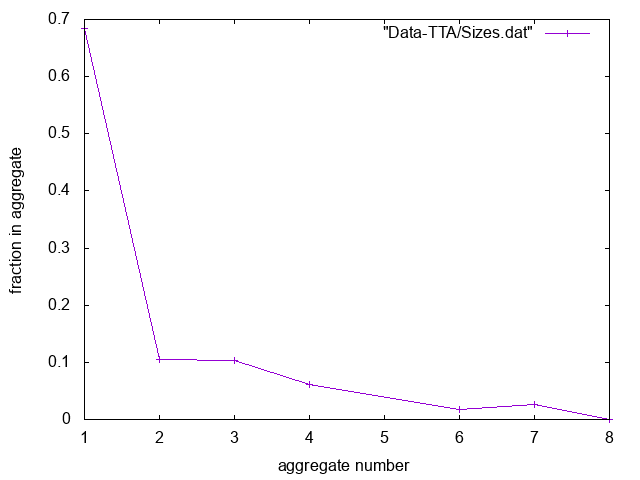
If we can bin the number of amphiphiles in aggregates of size n (Cn) versus n, we should see two behaviors below and above the CMC. Below the CMC, most of the amphiphiles exist as free monomers, so the histogram exponentially (perhaps not literally) decreases from C1 with the fraction close to 1. Above the CMC, there is both a minima in the distribution, and the fraction of monomers is less than 50%:
These things are not directly measurable via experiment, however with simulation we are able to make such an analysis. In the first case, we need to combine measurements from simulations at different concentrations, but with the latter, we can analyze at fixed concentration (per simulation). Both of these analyses will help us fix the CMC according to our model.
It is important to build and follow a consistent file convention. Here is how to do it for this project:
Directory structure: AMPHIPHILE/ANION/CONCENTRATION (that is, each amphiphile will be simulated with a number of anions, and each simulation will be at a different concentration.) For example: TTA/ABZO/1.0mM.
The TTA directory holds all the system martini_v3.0.0 ITP files, along with the TTA ITP and .gro, and water.gro file. The ABZO directory holds the ABZO ITP and .gro files (ABZO_bartender.itp). The simulation directory 1.0mM would have the following files:
In addition, you need the analysis script cmc.tcl; This can live anywhere, but it should live in one place, so you don't end up with many (possibly edited) copies, providing inconsistent data between different simulations. I suggest putting it in the TTA directory. Make sure it is executable:
/bin/bash $ chmod 755 cmc.tcl
Most of the analysis scripts are written in python, and they are conveniently run in a virtual conda environment. These environments pull together all the necessary programs and dependencies into one package, so it avoids having to install side programs just to run the process you want to. The steps are:
Here are two common examples. First, using an older version of gromacs. MDAnalysis, a python toolset which is commonly used for analysis is not able to read GROMACS .tpr files newer than 2025.1. So here we create a 2024.5 gromacs environment:
/bin/bash $ which gmx
/opt/homebrew/bin/gmx
/bin/bash $ conda create -n gmx2024 -c conda-forge gromacs=2024.5
.. some output ..
/bin/bash $ conda activate gmx2024
(gmx2024) /bin/bash $ which gmx
/opt/homebrew/anaconda3/envs/gmx2024/bin.ARM_NEON_ASIMD/gmx
(gmx2024) /bin/bash $ conda deactivate
/bin/bash $
For this environment, might be important to deactivate when finished if you need to use the newer version of GROMACS. Notice how the prompt is pre-pended to show that you are in a virtual environment (venv). Next we create an environment for MartiniGlass, requiring certain versions of python along with MDAnalysis and some other things. Once we create the environment, we go ahead and actually install MartiniGlass using the package manager pip:
/bin/bash $ conda create -n martini -c conda-forge \
python=3.11 mdanalysis=2.10 numpy scipy pandas matplotlib networkx biopython
.. some output ..
/bin/bash $ conda activate martini
(martini) /bin/bash $ pip install martiniglass # pulls vermouth as a dependency
..a bunch of output ..
It is safe to remain in this (martini) venv for general use. In fact, this environment will also be sufficient for the other python analysis tools (whereas simply trying to run them from a regular bash shell may not always work).
This is aptly covered elsewhere.
This is not simply to visualize your system; removing the water from a Wet Martini system reduces the amount of work the analysis script needs to do. A Dry Martini system does not have the solvent to begin with, but the coarse-grained topology will be better visualized with Martiniglass processing.
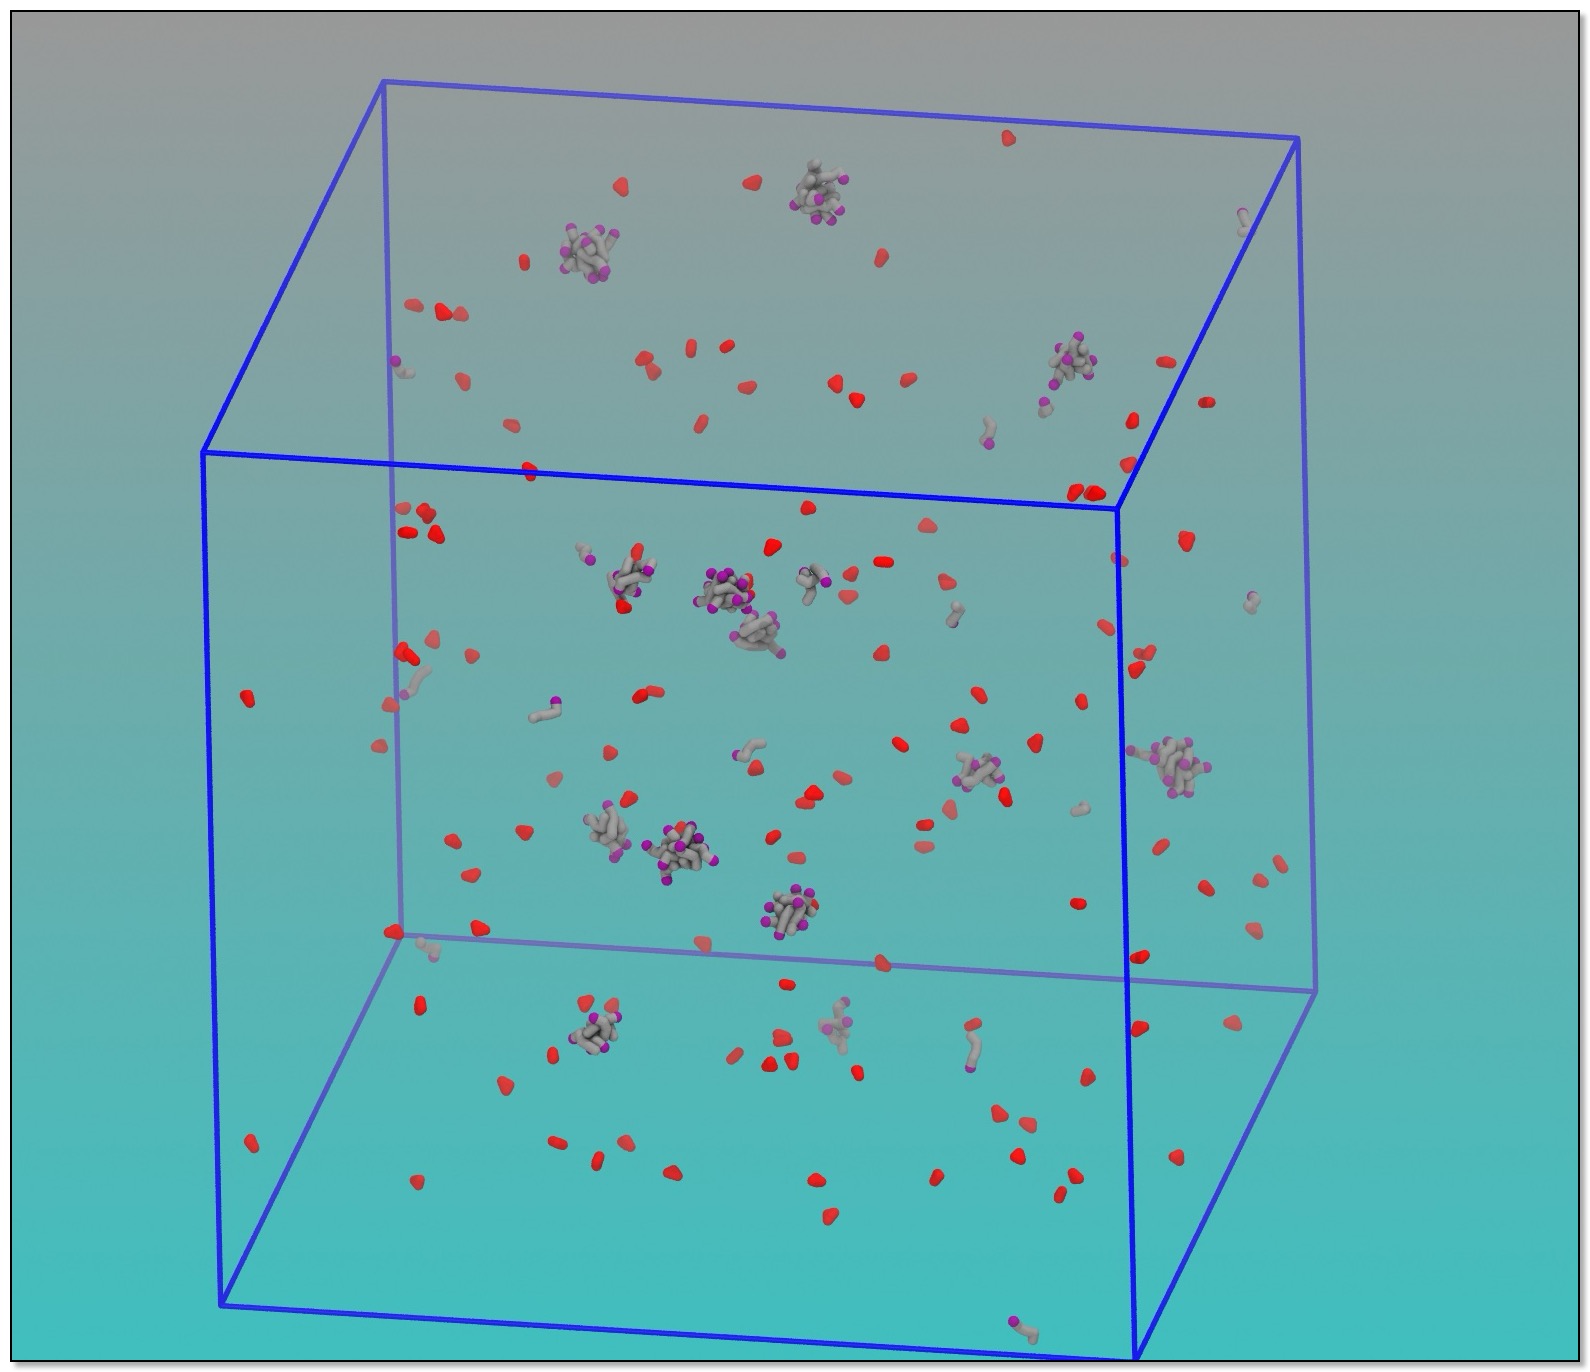
As usual, this process may be automated (for the most part, easily) but putting commands into a file, and running this as a command. It is convenient to make these scripts as general as possible, and this is a big reason to follow a standard filesystem hierarchy (for example CMC/TTA/Anion/concentration). Most analysis scripts (such as aggregation or radial distribution) are completely system-independent, and can be used for everything (hence they live in CMC/); The martiniglass script is somewhat residue-dependent, so it typically lives in CMC/TTA/. Here is the (bash) Martiniglass processing script make_vis.sh:
#!/bin/bash
# CMM 5/2026 (renamed from dry_martini.sh 7/2026 — it does martiniglass/VMD
# visualization prep, not force-field setup)
# WET martini. Needs to be run from a martiniglass-aware conda env ('martini').
#
# Produces:
# - water-stripped .gro and .xtc via martiniglass + gmx trjconv (MUCH smaller)
# - martini-aware VMD file
# - an MDAnalysis-readable analysis TPR (${label}-${stage}-vis.tpr) built with
# the gmx2024 conda env, because production TPRs from GROMACS 2026 are tpx
# v138 which MDAnalysis 2.10 cannot read (max 137). See memory:
# reference-tpx138-mdanalysis.
#
# run from the simulation directory.
# usage: make_vis.sh label stage [inxtc]
# label = 1.0mM, stage = run -> reads ${label}-${stage}.xtc by default.
# inxtc (optional 3rd arg) overrides the input trajectory. Use this for
# -noappend restart segments, e.g.
# make_vis.sh 200mM run 200mM-run.part0002.xtc
# or a trjcat'd continuation:
# gmx trjcat -f 50mM-run.part000[2-9].xtc -o 50mM-cont.xtc
# make_vis.sh 50mM run 50mM-cont.xtc
# Output keeps the ${label}-${stage}-vis.* names regardless of inxtc.
label=$1
stage=$2
inxtc=${3:-${label}-${stage}.xtc}
# gmx from the older env (writes tpx <=137 that MDAnalysis can read)
GMX2024=/opt/homebrew/anaconda3/envs/gmx2024/bin/gmx
# Build the vis tops from the production _System.top:
# ${label}_vis.top : header stripped (lines 1-5) for martiniglass -vf
# ${label}-run-vis.top : last line (W) removed -> water-stripped top
# that KEEPS the atomtypes header; grompp-able and
# matches the water-stripped -vis.xtc atom set.
cp ${label}_System.top ${label}_vis.top
cp ${label}_System.top ${label}-run-vis.top
# Strip EVERY water line, not just the last one. `sed '$d'` assumed a single
# trailing "W", which is wrong for a genconf-replicated system: those
# topologies REPEAT the molecule block (TTA,anion,W,TTA,anion,W), so one W line
# survives in the middle, the vis top then expects ~140k atoms the stripped
# -vis.gro does not have, and grompp dies. Matching on the molecule name is
# robust to however many blocks there are.
sed -i "" -E '/^[[:space:]]*W[[:space:]]+[0-9]+[[:space:]]*$/d' ${label}-run-vis.top
sed -i "" '1,5d' ${label}_vis.top
martiniglass -p ${label}_vis.top -f ${label}-${stage}.gro
gmx trjconv -f ${label}-${stage}.gro -s ${label}-${stage}.gro -n index.ndx -o ${label}-${stage}-vis.gro
gmx trjconv -f ${inxtc} -s ${label}-${stage}.tpr -pbc mol -n index.ndx -o ${label}-${stage}-vis.xtc
martiniglass -p ${label}_vis.top -vf
mv vis.vmd ${label}-${stage}-vis.vmd
# Analysis TPR for cmc.py / rdp.py (MDAnalysis-readable).
# Wet martini: water IS stripped from -vis.xtc, so use the water-stripped
# ${label}-run-vis.top (built above) against the stripped -vis.gro.
$GMX2024 grompp -p ${label}-run-vis.top -c ${label}-${stage}-vis.gro \
-f martini_run_vis.mdp -o ${label}-${stage}-vis.tpr -maxwarn 5
This file is well-commented so you should read through it.
(martini) /bin/bash $ cd CMC/TTA/TTAB/5.0mM
(martini) /bin/bash $ ../../make_vis.sh 5.0mM run #meaning the xtc is '5.0mM-run.xtc'
..a bunch of output ..
It is possible this script fails for various reasons. If so, make sure all the necessary files are present and try again.
Now we have a TPR file which is compatible with our analysis script. Even though we have run our simulation(s) for 300 ns, it takes a lot of time, at least 100 ns, for the amphiphiles to aggregate. It is good to know what to expect by looking at the energy of the system. Gromacs has a utility for this: gmx energy. This utility will generate data file which may be displayed in a plotting program called xmgrace. (It would be quicker to take a look with GNUplot — see below — but GROMACS makes this more difficult.)
/bin/bash $ gmx energy -f 1.0mM-run.edr -o 1.0mM-run-energy.xmgr
A menu will come up; Enter your energy selections, one per line, and finish with an empty line. I suggest Temperature and Total Energy. This will produce a file with an .xmgr extension. Now open this file in xmgrace:
/bin/bash $ xmgrace 1.0mM-run-energy.xmgr
What are we looking for here? We want to see the total energy, or the temperature, to be stable. That is, we want it to be "flat". xmgrace is a very useful, but complex plotting program, so we will avoid going into too much detail with it here.
We continue to analysis, and we assume that these results files now live in CMC/TTA/TTAB/1.0mM, and cmc.py lives in CMC (three directory levels above):
We use python to run the script. It is safest to use our (martini) venv and explicitly call python3. The arguments for the script are ID/concentration, XTC increment (nstxout-compressed) and resname of the surfactant:
(martini) /bin/bash $ python3 ../../../cmc.py 1.0mM 5000 TTA
By default, the script will use all available threads on the machine. There are optional arguments, which you may see by examining the script itself. There will be some informational output including the number of frames read, the time in ns, and so on. When it's finished, it will have created two directories and a number of files:
Data-TTA (which contains the aggregate size distributions by mass (Masses.dat) and cluster size (Sizes.dat (some important information in the header of this file)). These data correspond to the cluster size distributions mentioned above. Until we know which part of our trajectories are useful to look at, we can't really use these data yet.
Cluster-TTA (which holds mostly time-series information)
GNUplot is a program which can allow you to make quick plots of your data from the command line (it can do much more, however!). The plots in the next section were generated in GNUplot. Here is a quick introduction.
Call gnuplot:
/bin/bash $ gnuplot
gnuplot > plot "Cluster-TTA/cluster324.dat" with lines
gnuplot > plot "Cluster-TTA/cluster324.dat" w l
Notice the ability to abbreviate.
gnuplot > plot "Cluster-TTA/cluster324.dat" w lp
"lp" is short for "linespoints" which means lines and points.
gnuplot > plot "Data-TTA/Sizes.dat" using 1:3 with points
"using" (which can be abbreviated as "u") selects columns of data; The first number is the x-, and the second is y-.
Here are some results of a typical simulation. Do you think this system has stabilized? If so, when, and for what time period? These are the questions you want to answer at this stage.
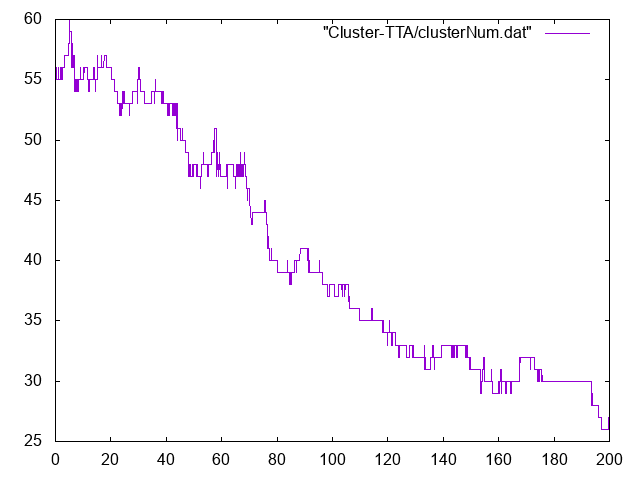
Numbers of clusters vs time
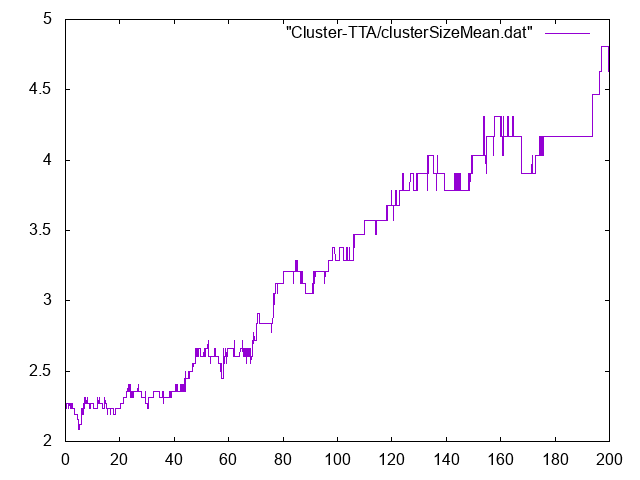
Mean cluster size versus time
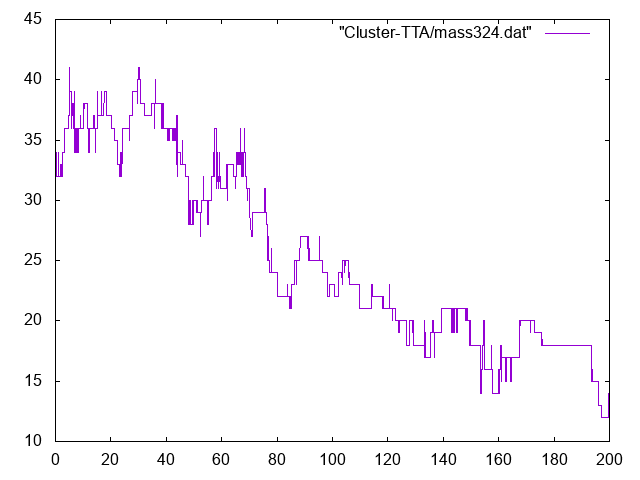
Numbers of monomers versus time
Let's assume that your simulation was 300 ns, and after examining the time series data in Cluster-TTA, you decide that the last 100 ns of simulation time are suitable for analysis. You may now use gmx trjconv to create a new trajectory from the original 1.0mM-run-vis.xtc. The -b time switch indicates the time (in ps) to start saving the new trajectory. The number in this example is 100,000 or 100 ns. It is easy to lose track of zeroes!
/bin/bash $ gmx trjconv -f 1.0mM-run-vis.xtc -s 1.0mM-run-vis.tpr -n index.ndx -b 100000 -o 1.0mM-last100-run-vis.xtc
Notice how we have effectively changed the prefix to our data from "1.0mM" to "1.0mM-last100", which will now be our argument to the analysis script. The only problem is that the TPR file does not have the same name. We can fix this by creating a symbolic link to our existing file (instead of simply copying the TPR file to this new name):
/bin/bash $ ln -s 1.0mM-run-vis.tpr 1.0mM-last100-run-vis.tpr
You can make sure it worked the way you expect with an 'ls -ls'. It should look something like this:
/bin/bash $ ls -ls *.tpr
0 lrwxr-xr-x 1 mccallum staff 17 Apr 9 12:39 1.0mM-last100-run-vis.tpr@ -> 1.0mM-run-vis.tpr
72 -rw-r--r-- 1 mccallum staff 36676 Apr 9 12:05 1.0mM-run-vis.tpr
The virtual file is pointing at the real file. Now you can run the analysis script again — this will overwrite all the data in the Cluster-TTA and Data-TTA directories.
/bin/bash $ vmd -dispdev text -e ../../cmc.tcl -args 1.0mM-last100 TTA BzO
Here is an example of plotting "Sizes.dat". Do you think this is pre- or post-CMC?
Useful commands for trajectories
gmx trjcat -f *.xtc -o concatenated_traj.xtc
Other measures
SANS-like analysis
Script Library: scriptlibrary.tar
PRELUDE: Some background
What are we looking for here? We would like to characterize two conditions: pre-CMC and post-CMC, and hopefully nail down the CMC itself. There are two main measures that a cluster/aggregation analysis can give us (but they are not the only ones!). Essentially, below the CMC, most of the amphiphiles are free monomers. Above the CMC, most of them are in micelles. One way to measure this is by comparing the concentration of free monomers and aggregates versus solution concentration. Free monomer (C1) concentration increases until the CMC, at which point the number remains constant or decreases. The number of amphiphiles in aggregates is small below the CMC, but increases linearly with concentration above the CMC:Monomer and aggregate concentration versus solution concentration
If we can bin the number of amphiphiles in aggregates of size n (Cn) versus n, we should see two behaviors below and above the CMC. Below the CMC, most of the amphiphiles exist as free monomers, so the histogram exponentially (perhaps not literally) decreases from C1 with the fraction close to 1. Above the CMC, there is both a minima in the distribution, and the fraction of monomers is less than 50%:
These things are not directly measurable via experiment, however with simulation we are able to make such an analysis. In the first case, we need to combine measurements from simulations at different concentrations, but with the latter, we can analyze at fixed concentration (per simulation). Both of these analyses will help us fix the CMC according to our model.
PRELUDE: File conventions
It is important to build and follow a consistent file convention. Here is how to do it for this project:
Directory structure: AMPHIPHILE/ANION/CONCENTRATION (that is, each amphiphile will be simulated with a number of anions, and each simulation will be at a different concentration.) For example: TTA/ABZO/1.0mM.
The TTA directory holds all the system martini_v3.0.0 ITP files, along with the TTA ITP and .gro, and water.gro file. The ABZO directory holds the ABZO ITP and .gro files (ABZO_bartender.itp). The simulation directory 1.0mM would have the following files:
- 1.0mM_System.top
- 1.0mM_System.gro
- minimization.mdp
- martini_eq.mdp (equilibrate for 10 ns or 330 000 steps)
- martini_md.mdp (run for 300 ns or 10 000 000 steps)
- run script (optional)
- visualization script (optional)
In addition, you need the analysis script cmc.tcl; This can live anywhere, but it should live in one place, so you don't end up with many (possibly edited) copies, providing inconsistent data between different simulations. I suggest putting it in the TTA directory. Make sure it is executable:
/bin/bash $ chmod 755 cmc.tcl
Conda Environments
Most of the analysis scripts are written in python, and they are conveniently run in a virtual conda environment. These environments pull together all the necessary programs and dependencies into one package, so it avoids having to install side programs just to run the process you want to. The steps are:
- Create the environment inducing any dependencies. This also stores the environment so you can call on it whenever you want.
- When you are ready to use the environment, you activate it
- You may leave the environment "running" or not. Sometimes it is convenient to do this, sometimes you should exit out when done.
Here are two common examples. First, using an older version of gromacs. MDAnalysis, a python toolset which is commonly used for analysis is not able to read GROMACS .tpr files newer than 2025.1. So here we create a 2024.5 gromacs environment:
/bin/bash $ which gmx
/opt/homebrew/bin/gmx
/bin/bash $ conda create -n gmx2024 -c conda-forge gromacs=2024.5
.. some output ..
/bin/bash $ conda activate gmx2024
(gmx2024) /bin/bash $ which gmx
/opt/homebrew/anaconda3/envs/gmx2024/bin.ARM_NEON_ASIMD/gmx
(gmx2024) /bin/bash $ conda deactivate
/bin/bash $
For this environment, might be important to deactivate when finished if you need to use the newer version of GROMACS. Notice how the prompt is pre-pended to show that you are in a virtual environment (venv). Next we create an environment for MartiniGlass, requiring certain versions of python along with MDAnalysis and some other things. Once we create the environment, we go ahead and actually install MartiniGlass using the package manager pip:
/bin/bash $ conda create -n martini -c conda-forge \
python=3.11 mdanalysis=2.10 numpy scipy pandas matplotlib networkx biopython
.. some output ..
/bin/bash $ conda activate martini
(martini) /bin/bash $ pip install martiniglass # pulls vermouth as a dependency
..a bunch of output ..
It is safe to remain in this (martini) venv for general use. In fact, this environment will also be sufficient for the other python analysis tools (whereas simply trying to run them from a regular bash shell may not always work).
Step 1: Run your simulation
This is aptly covered elsewhere.
Step 2: Martiniglass
This is not simply to visualize your system; removing the water from a Wet Martini system reduces the amount of work the analysis script needs to do. A Dry Martini system does not have the solvent to begin with, but the coarse-grained topology will be better visualized with Martiniglass processing.
As usual, this process may be automated (for the most part, easily) but putting commands into a file, and running this as a command. It is convenient to make these scripts as general as possible, and this is a big reason to follow a standard filesystem hierarchy (for example CMC/TTA/Anion/concentration). Most analysis scripts (such as aggregation or radial distribution) are completely system-independent, and can be used for everything (hence they live in CMC/); The martiniglass script is somewhat residue-dependent, so it typically lives in CMC/TTA/. Here is the (bash) Martiniglass processing script make_vis.sh:
#!/bin/bash
# CMM 5/2026 (renamed from dry_martini.sh 7/2026 — it does martiniglass/VMD
# visualization prep, not force-field setup)
# WET martini. Needs to be run from a martiniglass-aware conda env ('martini').
#
# Produces:
# - water-stripped .gro and .xtc via martiniglass + gmx trjconv (MUCH smaller)
# - martini-aware VMD file
# - an MDAnalysis-readable analysis TPR (${label}-${stage}-vis.tpr) built with
# the gmx2024 conda env, because production TPRs from GROMACS 2026 are tpx
# v138 which MDAnalysis 2.10 cannot read (max 137). See memory:
# reference-tpx138-mdanalysis.
#
# run from the simulation directory.
# usage: make_vis.sh label stage [inxtc]
# label = 1.0mM, stage = run -> reads ${label}-${stage}.xtc by default.
# inxtc (optional 3rd arg) overrides the input trajectory. Use this for
# -noappend restart segments, e.g.
# make_vis.sh 200mM run 200mM-run.part0002.xtc
# or a trjcat'd continuation:
# gmx trjcat -f 50mM-run.part000[2-9].xtc -o 50mM-cont.xtc
# make_vis.sh 50mM run 50mM-cont.xtc
# Output keeps the ${label}-${stage}-vis.* names regardless of inxtc.
label=$1
stage=$2
inxtc=${3:-${label}-${stage}.xtc}
# gmx from the older env (writes tpx <=137 that MDAnalysis can read)
GMX2024=/opt/homebrew/anaconda3/envs/gmx2024/bin/gmx
# Build the vis tops from the production _System.top:
# ${label}_vis.top : header stripped (lines 1-5) for martiniglass -vf
# ${label}-run-vis.top : last line (W
# that KEEPS the atomtypes header; grompp-able and
# matches the water-stripped -vis.xtc atom set.
cp ${label}_System.top ${label}_vis.top
cp ${label}_System.top ${label}-run-vis.top
# Strip EVERY water line, not just the last one. `sed '$d'` assumed a single
# trailing "W
# topologies REPEAT the molecule block (TTA,anion,W,TTA,anion,W), so one W line
# survives in the middle, the vis top then expects ~140k atoms the stripped
# -vis.gro does not have, and grompp dies. Matching on the molecule name is
# robust to however many blocks there are.
sed -i "" -E '/^[[:space:]]*W[[:space:]]+[0-9]+[[:space:]]*$/d' ${label}-run-vis.top
sed -i "" '1,5d' ${label}_vis.top
martiniglass -p ${label}_vis.top -f ${label}-${stage}.gro
gmx trjconv -f ${label}-${stage}.gro -s ${label}-${stage}.gro -n index.ndx -o ${label}-${stage}-vis.gro
gmx trjconv -f ${inxtc} -s ${label}-${stage}.tpr -pbc mol -n index.ndx -o ${label}-${stage}-vis.xtc
martiniglass -p ${label}_vis.top -vf
mv vis.vmd ${label}-${stage}-vis.vmd
# Analysis TPR for cmc.py / rdp.py (MDAnalysis-readable).
# Wet martini: water IS stripped from -vis.xtc, so use the water-stripped
# ${label}-run-vis.top (built above) against the stripped -vis.gro.
$GMX2024 grompp -p ${label}-run-vis.top -c ${label}-${stage}-vis.gro \
-f martini_run_vis.mdp -o ${label}-${stage}-vis.tpr -maxwarn 5
This file is well-commented so you should read through it.
(martini) /bin/bash $ cd CMC/TTA/TTAB/5.0mM
(martini) /bin/bash $ ../../make_vis.sh 5.0mM run #meaning the xtc is '5.0mM-run.xtc'
..a bunch of output ..
It is possible this script fails for various reasons. If so, make sure all the necessary files are present and try again.
Step 3: Simple energy analysis
Now we have a TPR file which is compatible with our analysis script. Even though we have run our simulation(s) for 300 ns, it takes a lot of time, at least 100 ns, for the amphiphiles to aggregate. It is good to know what to expect by looking at the energy of the system. Gromacs has a utility for this: gmx energy. This utility will generate data file which may be displayed in a plotting program called xmgrace. (It would be quicker to take a look with GNUplot — see below — but GROMACS makes this more difficult.)
/bin/bash $ gmx energy -f 1.0mM-run.edr -o 1.0mM-run-energy.xmgr
A menu will come up; Enter your energy selections, one per line, and finish with an empty line. I suggest Temperature and Total Energy. This will produce a file with an .xmgr extension. Now open this file in xmgrace:
/bin/bash $ xmgrace 1.0mM-run-energy.xmgr
What are we looking for here? We want to see the total energy, or the temperature, to be stable. That is, we want it to be "flat". xmgrace is a very useful, but complex plotting program, so we will avoid going into too much detail with it here.
Step 4: The analysis!
We continue to analysis, and we assume that these results files now live in CMC/TTA/TTAB/1.0mM, and cmc.py lives in CMC (three directory levels above):
- 1.0mM-run-vis.tpr (from our older version of GROMACS)
- 1.0mM-run-vis.xtc
- 1.0mM-run-vis.gro
We use python to run the script. It is safest to use our (martini) venv and explicitly call python3. The arguments for the script are ID/concentration, XTC increment (nstxout-compressed) and resname of the surfactant:
(martini) /bin/bash $ python3 ../../../cmc.py 1.0mM 5000 TTA
By default, the script will use all available threads on the machine. There are optional arguments, which you may see by examining the script itself. There will be some informational output including the number of frames read, the time in ns, and so on. When it's finished, it will have created two directories and a number of files:
Data-TTA (which contains the aggregate size distributions by mass (Masses.dat) and cluster size (Sizes.dat (some important information in the header of this file)). These data correspond to the cluster size distributions mentioned above. Until we know which part of our trajectories are useful to look at, we can't really use these data yet.
Cluster-TTA (which holds mostly time-series information)
- clusterNum.dat
- clusterSizeMean.dat
- clusterSizeMax.dat
- massXXX.dat
GNUplot
GNUplot is a program which can allow you to make quick plots of your data from the command line (it can do much more, however!). The plots in the next section were generated in GNUplot. Here is a quick introduction.
Call gnuplot:
/bin/bash $ gnuplot
gnuplot > plot "Cluster-TTA/cluster324.dat" with lines
gnuplot > plot "Cluster-TTA/cluster324.dat" w l
Notice the ability to abbreviate.
gnuplot > plot "Cluster-TTA/cluster324.dat" w lp
"lp" is short for "linespoints" which means lines and points.
gnuplot > plot "Data-TTA/Sizes.dat" using 1:3 with points
"using" (which can be abbreviated as "u") selects columns of data; The first number is the x-, and the second is y-.
Time series plots and discussion
Here are some results of a typical simulation. Do you think this system has stabilized? If so, when, and for what time period? These are the questions you want to answer at this stage.
Numbers of clusters vs time
Mean cluster size versus time
Numbers of monomers versus time
Trimming the data and gathering aggregate results
Let's assume that your simulation was 300 ns, and after examining the time series data in Cluster-TTA, you decide that the last 100 ns of simulation time are suitable for analysis. You may now use gmx trjconv to create a new trajectory from the original 1.0mM-run-vis.xtc. The -b time switch indicates the time (in ps) to start saving the new trajectory. The number in this example is 100,000 or 100 ns. It is easy to lose track of zeroes!
/bin/bash $ gmx trjconv -f 1.0mM-run-vis.xtc -s 1.0mM-run-vis.tpr -n index.ndx -b 100000 -o 1.0mM-last100-run-vis.xtc
Notice how we have effectively changed the prefix to our data from "1.0mM" to "1.0mM-last100", which will now be our argument to the analysis script. The only problem is that the TPR file does not have the same name. We can fix this by creating a symbolic link to our existing file (instead of simply copying the TPR file to this new name):
/bin/bash $ ln -s 1.0mM-run-vis.tpr 1.0mM-last100-run-vis.tpr
You can make sure it worked the way you expect with an 'ls -ls'. It should look something like this:
/bin/bash $ ls -ls *.tpr
0 lrwxr-xr-x 1 mccallum staff 17 Apr 9 12:39 1.0mM-last100-run-vis.tpr@ -> 1.0mM-run-vis.tpr
72 -rw-r--r-- 1 mccallum staff 36676 Apr 9 12:05 1.0mM-run-vis.tpr
The virtual file is pointing at the real file. Now you can run the analysis script again — this will overwrite all the data in the Cluster-TTA and Data-TTA directories.
/bin/bash $ vmd -dispdev text -e ../../cmc.tcl -args 1.0mM-last100 TTA BzO
Results of the analysis
Here is an example of plotting "Sizes.dat". Do you think this is pre- or post-CMC?
Useful commands for trajectories
gmx trjcat -f *.xtc -o concatenated_traj.xtc
Other measures
SANS-like analysis